A bit over a week ago, I found a DAW called Bespoke. It features a rich set of composable audio and modulation modules that can be freely instantiated and connected (and I thought Reaper’s routing was cool).
More importantly, there’s a scripting module. It offers note, pulse and modulation inputs, note outputs, and api-based integration with other Bespoke modules.
Shenanigans Ensue: TIS-100
UniQMG see turing complete node-based visual environment, UniQMG write TIS-100 interpreter
TIS-100 is one of my favorite things to emulate. The language is dead simple to parse and evaluate, and the simple-but-distributed architecture lends itself to interesting implementations.
The interpreter itself is nothing fancy. Programs are passed in as a string. Each script node runs one instruction for every pulse it receives.
Communication between nodes is implemented using Bespoke’s note infrastructure. Scripts can send and recieve notes, which have a 7 bit pitch and 7 bit velocity values. Side register read/writes are done using a two-phase message system.
When a node is attempting to read a value, it sends REQUEST_VALUE
messages every tick. When a node that is trying to write a value recieves
a REQUEST_VALUE from the correct side, it clears its write buffer and
sends back a VALUE_SEND.
Each message transfers a 32 bit number and is split up across 6 notes.
Seven bits of value are packed into the pitch. Three bits of sequence
number (1-6), two bits of side number (UP, RIGHT, DOWN, LEFT),
one bit of message type (REQUEST_VALUE or VALUE_SEND) and a one bit
data marker are packed into the velocity. Nodes can also send regular
non-data notes by not setting the data marker bit. This halves the
available pitch precision, but it’s not a huge issue.
Proxy and Gate scripts are used to filter notes to ensure they’re
flowing the right way. Proxy scripts only allow messages with the
specified direction through, and Gate scripts only allow non-data
notes through.
And yes, HCF is implemented. It does, in fact, crash Bespoke.
Unfortunately this implementation seems to suffer from some race conditions. I attempted to implement playable Tetris (using a visualizer node with read-out capability to act as RAM for board state) but gave up after getting random deadlocks when running at higher pulse rates.
Shenanigans Ensue: Oscilloscope Wizardry
After my failure to implement Tetris at the TIS-100 level, I tried something a little more esoteric: Drawing it directly on Bespoke’s background oscilloscope.
This… failed. Scripts don’t run at audio rate, and there’s a limit on how many scheduled value changes you can queue up.
Fubble this
A bit later, I realized the quite useful fubble module had an interesting use case. The fubble is essentially a two-dimensional drawable modulation source that runs at audio rate. Hook it up to a constant value’s gain and you can use it to draw on an oscilloscope directly:
It’s also concerningly good at producing engine sounds; unmute the video on the right and take a listen (⚠️ Loud audio crackling). Turns out the Bespoke dev also discovered this, and I used his setup for a much less crackly sound.
Next, combining the oscilloscope-drawing fubble and some audio-rate transformations courtesy of the waveshaper node, I came up with a way to perform arbitrary transformations and create “oscilloscope sprites”. Add a few of those sprites and some scripting for control and you’ve got yourself the workings for a vector art game:
How it works
As it turns out, drawing arbitrary images on Bespoke’s oscilloscope is actually really easy: treat L/R stereo audio as being X, Y coordinates. Move the ‘cursor’ around really quickly and you can draw lots of stuff.
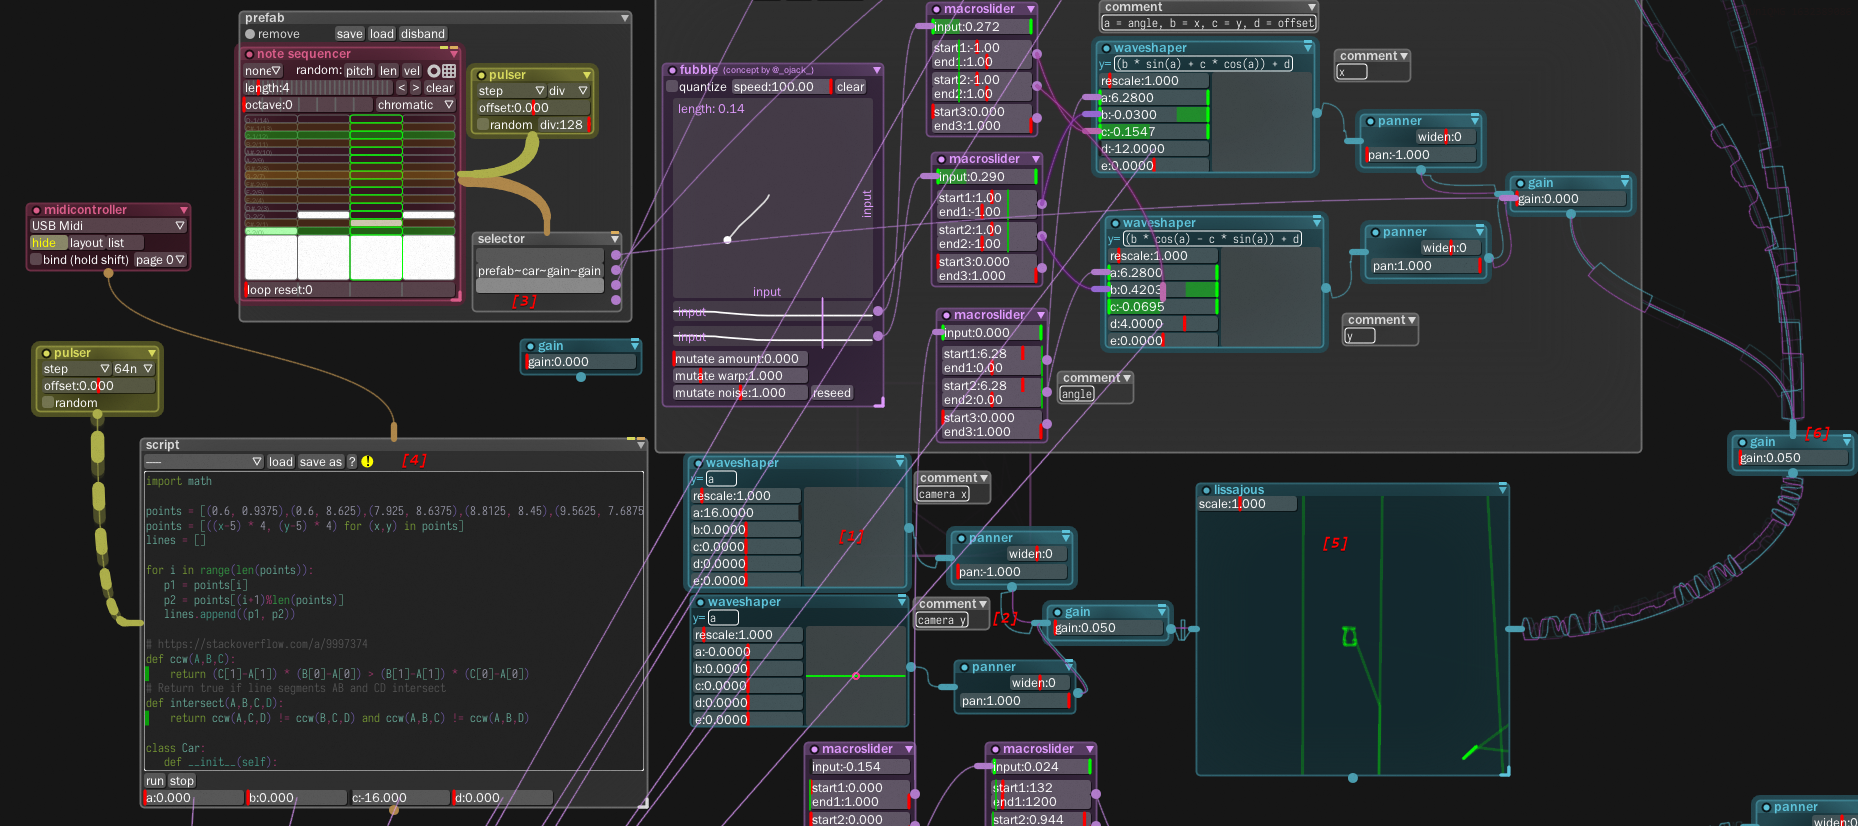
- The camera controls. Used to provide constant offsets to pan the scene around.
- Combines the two camera axes into a stereo signal and sends it directly to the oscilloscope. This offsets everything being drawn.
- Sprite selector. Rapidly switches which sprite is being drawn, to give the illusion of drawing multiple. The track sprite is drawn twice per cycle to make it sharper.
- The car script. Handles high level driving logic, collision detection, and is responsible for updating the sprite input values.
- The main oscilloscope. Drawn value is the sum of all inputs, so only one sprite and the camera controls are drawn at a time.
- Main sprite gain. All the oscilloscope sprites are connected to this, and scaling it allows zooming the view.
Oscilloscope sprites
![]()
- The fubble node. Draw stuff here and set the speed super high. Will need fine-tuning to get it to look sharp on the oscilloscope.
- The X coordinate formula. This is where all the sprite transformation is done. Angle is fed in as
a, x and y asbandc, anddas an absolute axis offset. - The Y coordinate formula. Similar to #2.
- Panner nodes, for assigning #2 and #3 to stereo audio channels.
- A rapidly-toggled gain node to switch between which sprite is being drawn. You can add another gain node before this one for scaling.
- Angle input, for rotating the sprite.
Download
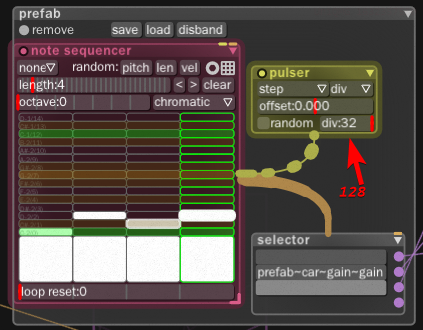
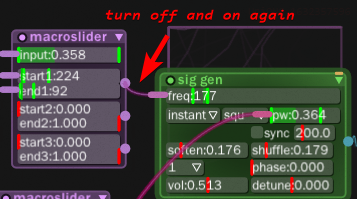
You can download the CarTime2-1.02.bsk patch and play with it yourself. You’ll need to make a few tweaks whenever you load it, since Bespoke currently has some bugs that prevent modules from loading some values properly:
- change the upper bound (hold ctrl) of the rate on the pulser connected to the note sequencer to 128, and then set it to 128
- disconnect and reconnect the macroslider->siggen connection
The car is controlled via MIDI.
Gas is C, reverse is C#, left is D, right is E.